
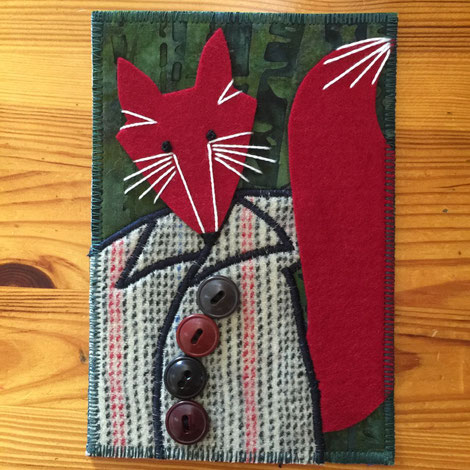
In this blog, I'll talk about the process that I go through in designing a new Fiber Art Card. The photo to the right is Mr. Fox in a Wool Coat. Foxes are a favorite subject at Pine Tree Studio because I love to spy them running around the forest outside my window. And, it's getting close to winter, so why not give Mr. Fox a coat with the wonderful felted wool cloth and vintage buttons that I have in the studio?
So, first there is an idea, then comes the sketching. It usually takes a few tries to get the ideas from my head, through the pencil and onto paper. When translating an idea or a drawing into fiber art, the drawing has to be refined to be simple enough to cut into fabric shapes that can then be appliquéd, but also the drawing must fit to the size (4.25x6.25 inches to fit neatly onto a 5x7 inch blank card) and still pack a punch.
Here are my sketches from the first to the refined sketch that becomes my pattern.


Once I've settled on a sketch, I separate the major elements into pattern pieces. The pattern pieces get traced onto a light fusible interfacing (my favorite is HeatnBond Lite) and fused to either cotton or wool, then cut to shape.


Background fabrics must be auditioned and then fused to Pellon 71F interfacing which gives a sturdy surface for the embellishing stitches to come. First, the bottom layers of pattern pieces are satin stitched using free-motion embroidery with a clear lucite Darning Presser Foot. When all the pieces are attached to the background, a final wide zig-zag satin stitch is done around the border using the Walking Presser Foot.


After the sketch and the pattern pieces are cut and stitched, the final embellishment is done with hand embroidery of the face and tail and attachment of the vintage buttons. All that needs to happen now is to attach the piece to a card blank. I hope you enjoyed seeing how an idea turns into a new work.


