When people ask me how to do free-motion quilting or free-motion embroidery, my first response is PRACTICE, PRACTICE, PRACTICE! When you start, this is new brain-hand-eye coordination, and like any skill, you will improve the more you practice.
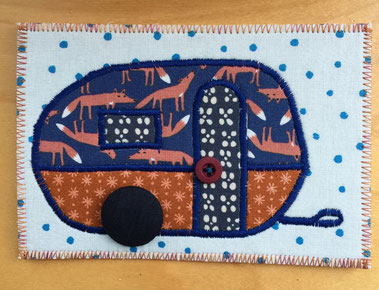
I do a lot of satin stitching with the sewing machine to appliqué my fabric shapes to both Fiber Art Cards and Potholder/Mini-Quilts. I love the graphic quality of the satin stitch using colorful threads to outline my drawings in fabric.
So here's an overview with some very short video clips showing how to move around curves and turn corners while free-motion embroidering.
After the videos, there are some photos showing how the sewing machine settings need to be changed to do free-motion embroidery. Enjoy!
Sometimes, I just use the basic zig-zag stitch to outline the border of my work with the feed dogs engaged and a Walking Presser Foot - in this way the machine creates even, stitches and advances the fabric evenly through (pictured).
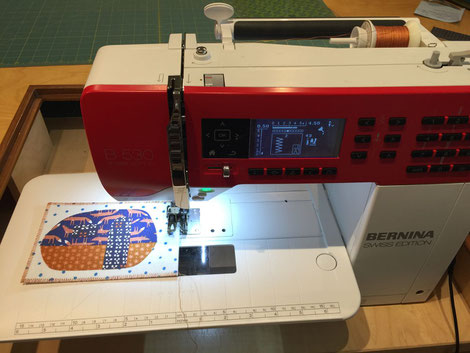
Free-motion Embroidery also can be done with a basic home sewing machine using the zig-zag function. What makes this "free-motion" is that the feed dogs are dropped, so that I am controlling where the fabric is moved instead of the machine. For this, I need to change the presser foot to a clear lucite darning foot and get ready to put my hands firmly on the fabric to move it around. Pictured is fabric fused to a stabilizer base, which I recommend so that the stitches lay flat and do not distort the fabric. Learn more in this blog post.
video #1
I am demonstrating free-motion machine embroidery on a Bernina home sewing machine. In this clip I am working around a circular shape with a wide zig-zag creating a solid "Satin Stitch" which outlines the shape and completes the appliqué. Notice that my hands are on the work providing stability - somewhat in the shape of an embroidery hoop. The feed dogs are dropped and a clear lucite darning foot is attached encircling the needle.
video #2
Notice in this video clip that I am keeping up a medium-high speed on the machine. This is essential, because if free-motion embroidery is done at a slow speed, you may pull the fabric and force the needle to bend and hit the metal base plate (beware of broken needles!). When first trying free-motion embroidery, it may feel reckless to hit the gas pedal and go at break-neck speed, but it's necessary! Keep your needle in "needle-down" position, so that when you pause to take a breath, you can resume and not break the beautiful straight line of the satin stitching.
video #3
A wide zig-zag stitch creates the "Satin Stitch" used to outline forms in machine appliqué. This clip shows how to turn a 90 degree angle by stopping the machine with the needle down and pivoting the work before proceeding.
Prepping for Free-Motion Embroidery:
drop the feed dogs (usually done by depressing a button- consult your manual)


Prepping for Free-Motion Embroidery:
ATTACH CLEAR LUCITE DARNING FOOT FOR FREE-MOTION EMBROIDERY- two variations shown


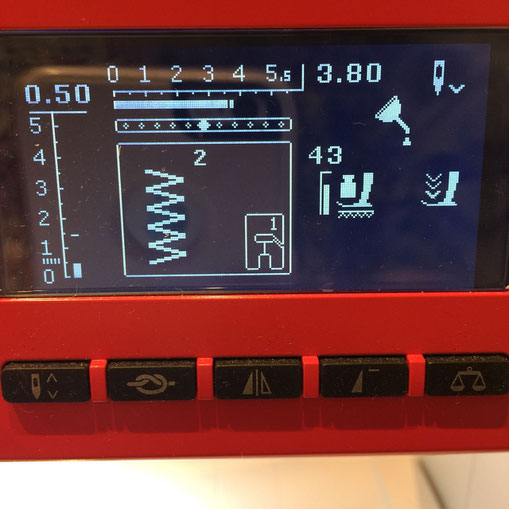
Prepping for Free-Motion Embroidery:
set your machine to zig-zag (bernina 2), wide stitch width (here set at almost 4)
and low stitch height (here set at .50)